Whilst this might show my age a little, when I first set up a personal website one of the biggest challenges I faced was finding reliable low cost hosting. Many may remember hosting on “free” providers which would sneak in advertising content, whilst others would have periods of unannounced downtime or flaky upload services.
After a while, I figured the only way to host a site was to pay for the service and, with most of the free providers going away anyway, I bought up the space I needed but with creeping costs for a site I rarely used I eventually gave up doing anything much with the few domain names I kept around (largely because I had email accounts that I wanted to keep!). But a few years ago I discovered I could easily host my site entirely for free* on Microsoft Azure – and they’ve actually continued to make it easier (albeit perhaps somewhat confusingly documented!) with various improvements to the platform – so this post is all about how to get started with hosting a simple (static) site on Azure for free!
*Free, of course, is subject to some usage restrictions – not a challenge I’d like face as I noted here, but if you’re doing the same it’s worth reviewing the charging model for blob storage
NB: For the time being, I’m setting this up as a HTTP site – not HTTPS – I’ll talk about enabling HTTPS in a future post!
Setup storage for your site
- First thing we need is to create some storage with Azure – Log into the Azure Portal and click on Storage Accounts.

2. Click on Add and then enter in a suitable Subscription, Resource Group name, Storage Account Name and Location. You can check out the various other options available, but for my purposes I found the rest of the defaults on this page just fine!
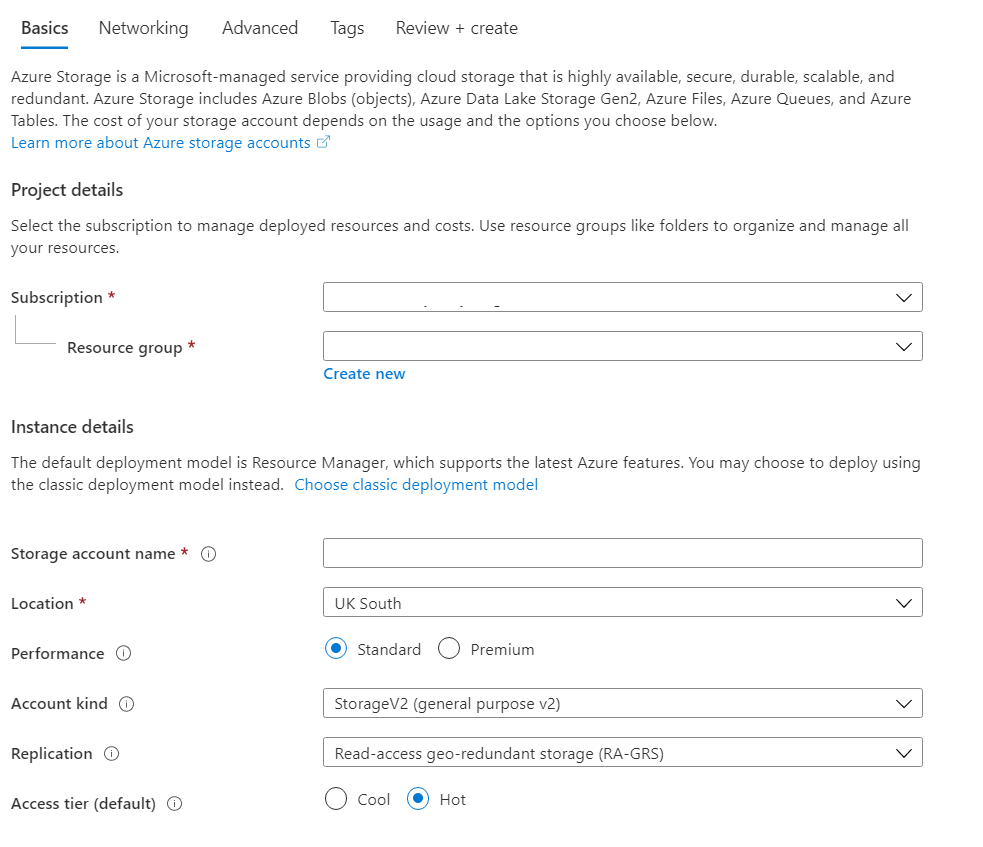
3. Click on Advanced and set the Secure Transfer Required to Disabled (for HTTP access, rather than HTTPS)
4. Click on Review + Create
5. Once it’s complete, you have your storage all set up and ready to go.
Setup your site
- Go to your Storage Store (created in the previous section) and click on Static Website (under Settings)
- Click Enable, and make a note of the settings here, we’ll need them later – the most important part is the Index document name (that’s our default page that you’ll be serving up) and the Primary Endpoint (which we’ll use for our cname creation process below).

3. Click Save
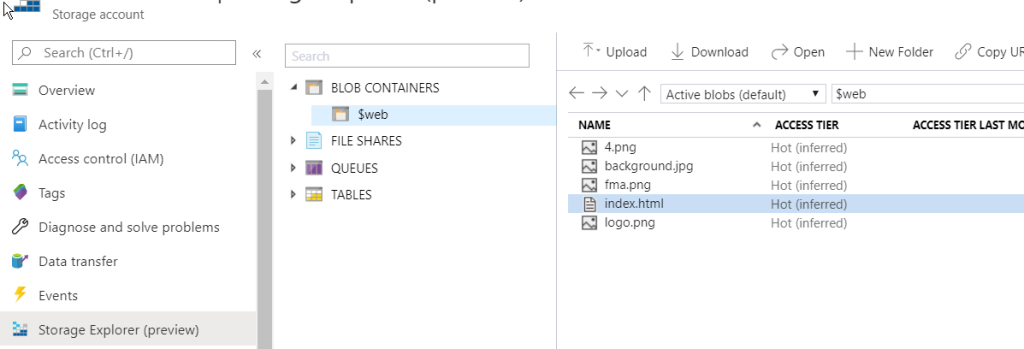
4. Once that’s set, we can upload our site – there’s various ways to do this, but perhaps the simplest is to use the Storage Explorer preview – if you click on this and expand your BLOB CONTAINERS you’ll find a new path called $web (the eagle eyed amongst you will have spotted that’s the page mentioned when you set up the state website). You can simply use the upload button to upload the relevant content – including any images, files, etc you want – just make sure you have a page that matches with your index document name (index.html in step 2 above!).
5. With that done, your website is live! But you’ll only be able to access it on the address described as the Primary Endpoint above (although now is a good time to test it out! Next, we’ll set up a CNAME so you can map your own address/
Setup your DNS
This activity has two activities wrapped up into one – one to verify the URL for Azure services (to prove you aren’t just abusing the service) and another that actually sets the desired cname!
- I’m going to give examples from 123-Reg.co.uk, but other providers will offer similar features – we want to create a CNAME to the Azure storage. So I’ve logged into 123-Reg.co.uk and gone to Manage your DNS and gone to the Advanced DNS section
- We want to create a verification cname first – this should be asverify.SUBDOMAIN – e.g. if I wanted to have my website on myweb.mydomain.com my subdomain would be myweb and the cname hostname would be asverify.myweb.
In the screenshot below you can see (the top entry) my asverify for www.mydomain.com.
This entry in turn should have a destination/target that is the address from the previous section called Primary Endpoint – with asverify in front again – e.g. if your Primary Endpoint was called https://storageaccountname.z22.web.core.windows.net you would set your destination/target value to be asverify.storageaccountname.z22.web.core.windows.net
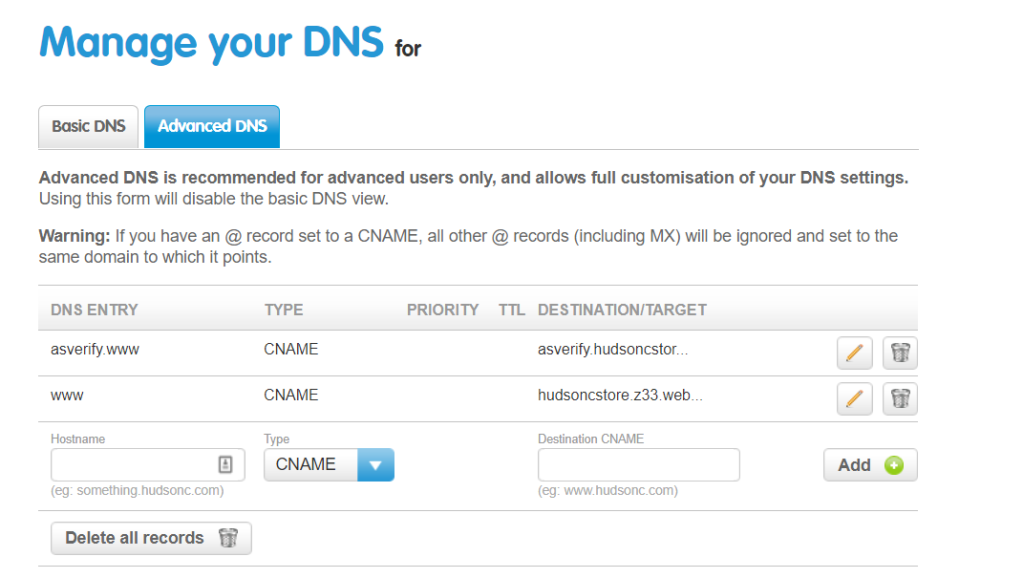
3. Finally, I’m going to create my “final” CNAME – I create a second CNAME with simply www as the DNS entry, and the destination / target as the storage url – e.g. storageaccountname.z22.web.core.windows.net
Link your CNAME
- In Azure, go to your Storage Account, and, from the menu bar on the left, select Custom Domain (it’s under Blob Service):

2. Set your domain name including your subdomain value – note that this time this is the actual subdomain you want to use, not including the “asverify” prefix – e.g.

3. Ensure you check the box to use indirect CNAME validation.
4. Click Save
And that should be you – live!
